A room read through its walls
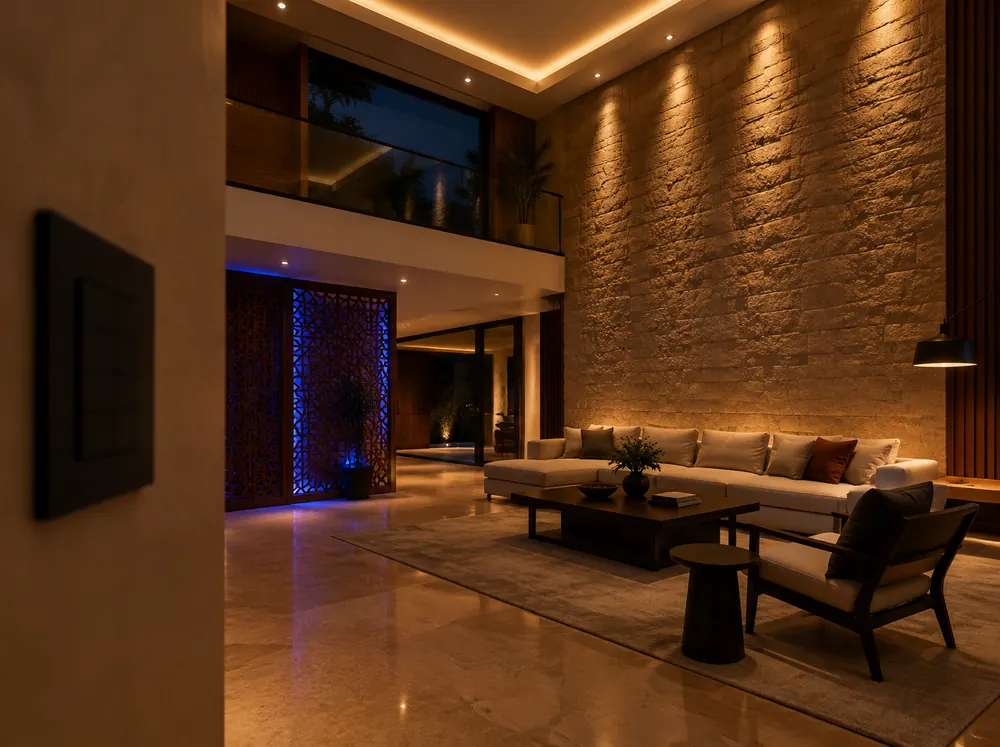
The living room is where lighting is judged most closely. It holds the strongest architectural surfaces, the art, the furniture people sit in for hours and, increasingly, a double-height volume. It is also where a grid of identical downlights does the most damage, lighting the floor and the tops of heads while the walls and the volume stay dark.
The beam strategy here is about hierarchy and vertical light. Decide what the room should be read through, then choose beams that put light there and keep it off everything else.
This guide applies the principles in our beam angle and optics guide to living spaces. It covers:
- Building a lighting hierarchy before choosing a single fitting.
- Beam sizing for art, sculpture, stone and jaali.
- Double-height halls and long throws.
- Seating, faces, TV walls and the dining edge.
- Scenes that let one room serve several moods.
1. Volume first: vertical illuminance
A living room feels generous when its walls and upper volume are lit, and cramped when only the floor is.
- Light the walls you want to see. Perception of space comes from vertical surfaces. A softly washed or grazed wall makes the room feel wider than a brighter floor ever will.
- Use the ceiling as a reflector. Indirect cove light or uplight on a pale ceiling lifts the volume without a single visible source.
- Wide downlights are the weakest tool here. They put most of their light on the floor and furniture, and their sources sit in everyone’s peripheral view.
- Leave some walls quiet. Darker surfaces give the lit ones their weight. Not every wall needs light.
2. Build the hierarchy before choosing fittings
Assign every surface a role, then assign beams. A typical hierarchy:
| Role | Examples | Beam approach |
|---|---|---|
| Primary focus (one) | Feature stone wall, main artwork, puja niche | Strongest accent; narrow beam or graze; highest contrast |
| Secondary (a few) | Sculpture, shelving, second artwork, plants | Narrow to medium accents at lower intensity |
| Architectural | Other walls, ceiling volume, columns | Wash, graze or indirect light at low level |
| Functional | Seating zone, circulation, dining edge | Soft, wide or indirect; low contrast |
- One primary focus. Two equal primaries compete. If the stone wall leads, the artwork follows.
- Contrast does the ranking. Using the conventions in the pillar guide, a primary accent at around 10:1 to 15:1 over ambient leads clearly; secondary accents at around 3:1 to 5:1 support it.
- Narrow beams make the hierarchy possible. They raise the accent without lifting the ambient level, which is what keeps the ratio high.
3. Art: sizing the beam to the work
- Aim at about 30° from vertical to the artwork’s centre (see section 9 of the pillar guide). At a 3.0 m ceiling and an artwork centred at 1.6 m, the fitting sits about 0.8 m from the wall.
- Measure the actual throw. At that aim, the distance from the fitting to the artwork’s centre is about 1.6 m, not the ceiling height. Size the beam at that throw.
- Pool slightly larger than the work. At a 1.6 m throw, a 24° beam gives a pool of roughly 0.68 m; a 36° beam about 1.04 m. A 1.0 m wide canvas wants the wider of the two, or two narrower fittings.
- Expect an ellipse. The tilt stretches the pool vertically. Landscape works often need two fittings or an elliptical lens set horizontally.
- Glazed works: check reflections from the main seating position, not just from in front of the work.
- Soft edge for paintings, so the frame does not sit inside a visible ring. A hard-edged pool suits a single sculptural object better than a canvas.
- Framing projectors shape light to the rectangle of the work exactly. They are the precise option for a single important piece, at higher cost and with careful setup.
4. Sculpture and objects: modelling in three dimensions
A single beam from above flattens a three-dimensional object or casts a hard downward shadow. Sculpture needs modelling.
- Key and fill: a primary narrow beam from one side (the key) and a weaker, wider beam from the other (the fill). A common starting convention is a key-to-fill ratio of about 2:1 to 3:1; more makes it dramatic, less makes it flat.
- Light from the front quarter, not straight down. Downlight alone creates harsh shadows under every projection.
- A single-emitter source gives one clean shadow. Multi-emitter sources can cast several faint shadows from one object.
- Backlight for silhouette: a narrow beam on the wall behind an object reads its outline against the light.
- Shelving: linear profiles at each shelf front, or narrow spots aimed into the shelf, light the objects rather than the shelf above them.
5. Stone, jaali and textured walls
- Sandstone and textured plaster: graze with a narrow beam or linear profile close to the wall. The relief becomes the design. See grazing vs washing in the pillar guide.
- Jaali screens: a narrow beam from behind or the side throws the pattern as shadow onto the surface beyond. A narrower beam and a smaller source give a sharper pattern.
- Fluted panels: graze along the flutes to deepen them.
- Polished stone and lacquer: wash from a larger offset and check reflections from the seating. Grazing exposes every imperfection and reflects the source.
- Continuous surfaces read best with a continuous source. A linear LED profile in a ceiling slot avoids the scallops of a downlight row.
6. Double-height halls
Double-height living halls are common in independent homes in Odisha, and they change the beam calculation.
- Throws of 5–7 m need narrow optics. From 6 m, a 36° beam spreads to about 3.9 m on the floor; a 15° beam about 1.6 m. The wide beam lights the air and everything around the target.
- Intensity falls with the square of distance. Doubling the throw needs four times the intensity for the same illuminance. Specify by candela, not wattage.
- Light the upper volume. A grazed upper wall, a lit ceiling plane or an uplit column reveals the height. Floor-only light makes a double-height room feel like a well.
- Mid-height sources on walls or columns shorten the throw for accents near eye level, and avoid relying on a ceiling 6 m away.
- Maintenance: high fittings need access for aiming and cleaning. Plan it before choosing adjustable spots at 6 m.
- Chandeliers and pendants carry much of the visual weight in such spaces. Keep accent beams from striking their glass and throwing sparkle into eyes.
7. Seating zones and faces
People spend hours in the seating zone. Light there should flatter faces and keep sources out of view.
- Avoid narrow downlights directly over seats. Light from straight above casts shadows in the eye sockets and under the nose, and the source sits in view whenever someone leans back.
- Vertical light on faces comes from lit walls and indirect light around the seating, not from overhead spots.
- Table lamps and floor lamps remain the most flattering seating light. Coordinate their position with the architectural scheme.
- Low contrast in the seating zone keeps eyes comfortable moving between faces, art and screen.
8. TV walls and screens
- No spots aimed so their reflection lands in the screen from the main seating positions. Check the reflection geometry on the section.
- A soft wash or bias light behind the screen reduces the contrast between a bright screen and a dark wall, which is more comfortable for viewing.
- Keep the TV wall at a lower level than the primary focus unless the TV wall itself is the feature, such as a stone or fluted cladding.
- A cinema scene dims accents and keeps only the bias light and a low path light. See scene control.
9. The dining edge
Where living and dining share a space, the dining table becomes a focus of its own.
- A pool sized to the table. For a 3.0 m ceiling, the throw to the table top is about 2.25 m; a 24° beam gives roughly 0.96 m, a 36° beam about 1.46 m. A long table usually wants two or three fittings in a row.
- Faces across the table need some vertical light, so pair the downlights with a softer pendant or wall light.
- Pendants over the table set the visual centre. Keep their sources shielded at seated eye height.
10. Scenes: one room, several moods
A living room serves a family evening, a large gathering, festival lighting and a film night. One fixed scheme cannot do all four.
- Group fittings by role (primary accent, secondary accents, architectural, functional) so each group dims independently.
- Typical scenes: everyday, entertaining (higher architectural light), evening (accents up, ambient down), cinema, and a festival or puja scene.
- Dimming quality matters for narrow accents: flicker and colour shift at low levels are most visible on a lit wall.
- Voice and app control suit families who want scenes without a keypad on every wall. See smart lighting controls.
Specification notes
- Start with the hierarchy: one primary focus, a few secondary, the rest quiet.
- Light vertical surfaces and the ceiling volume before adding any downlight.
- Size art beams at the real tilted throw, aimed at about 30° from vertical.
- Model sculpture with a key and fill, not a single downlight.
- Use narrow, high-candela optics for double-height throws, and light the upper volume.
- Keep narrow downlights off seating and their reflections out of the TV screen.
- Group fittings by role and plan scenes from the start.
Frequently asked questions
What beam angle should I use for living room downlights?
For general light at a 2.7–3.0 m ceiling, wider beams around 36° to 60° give soft, overlapping coverage, but most living rooms work better with fewer downlights and more light on walls and the ceiling. Accents on art and objects usually need narrow to medium beams, sized to the object at the actual throw.
How do I light a double-height living room?
Use narrow, high-intensity optics for accents from the high ceiling, light the upper walls or ceiling plane to reveal the volume, and add mid-height sources on walls or columns for objects near eye level. Plan access for aiming and maintenance.
How do I stop spotlights reflecting in the TV?
Check the reflection geometry from the main seats on a section drawing, and move or re-aim any fitting whose reflection lands in the screen. A soft wash behind the screen also makes viewing more comfortable.
How many spotlights should a living room have?
There is no fixed number. Start from the surfaces that need light (one primary focus, a few secondary accents, the architectural layer) and add only the fittings each role needs. Fewer, better-aimed beams usually look more premium than a dense grid.
Continue the series
- Beam Angle in Lighting Design: Optics, Lenses and the Architecture of Light
- Beam Angle in Bedroom Lighting: Designing for the Reclined Eye
- Beam Angle in Workspaces: Glare Control, Task Planes and Faces on Camera
Planning a living space in Bhubaneswar, Cuttack or elsewhere in Odisha? Book a free consultation and we will build the beam schedule and scenes with your design team.
About the author
Prem Rout, Founder of JMAP Solutions, set up in 2022 to deliver lighting, automation and building management solutions from Bhubaneswar. Over 15 years of experience in building products, construction and project business development across Mumbai and Odisha, working where design intent meets specification and site delivery. Connect on LinkedIn.